
7 Landscape Photography Tips - Take Amazing Landscape Photos
Landscape photography is basically the capturing of an image of nature, but there is so much more to it than that. If it was that easy, every tour bus would be filled with landscape photographers … and I would be out of a job …
First of all, you don’t have to be connected to the scene, but you do need to be familiar with it to create a great landscape photograph. It can be a grand landscape to a small detail within that landscape, taken with a whole host of different lenses.
If people tell you that you need the latest and greatest camera to be a landscape photographer … smile politely and back away from the website, conversation or person as this is really not the case. I have taken some of my favourite images with an entry level camera … and a few even on an iphone …
What it comes down to is knowing the area, being in the right place at the right time, and knowing how to get the best out of the camera kit that you have.
So here are my 7 Landscape Photography Tips … and a bonus if you read all the way to the end!
01. Always Have your Camera With You
If you are out photographing landscapes around you and your camera is in your bag. You might miss the moment … so even if you are walking to the location you have in mind, keep your camera out and ready to go.
I use a clip on my rucksack so it is really easy to access and gives me a good chance of capturing those fleetingly great bits of light that sometimes come and go in an instant.
If you don’t have a clip and you are walking to a location, just make sure you have your camera out on it’s strap. I have had so many occasions where I could have gotten a great landscape photo, but it was packed away all safe and tidy in my bag … and by the time I was ready to take the photograph … the light had gone and I had to wait for another beam of light to come through.
If you drive a lot with your work, this is when it is good to have your camera with you … before I became a professional photographer, I was a carpenter but I always had my camera with me … hidden under the passenger seat of my van. This enabled me to get some great photographs that I wouldn’t have been able to get normally. ANd this was when camera phones weren’t that good, so having a decent DSLR to hand was great.
You know what it is like, those beautiful skies always seem to appear when you are on the way to the shops, or when you are on your way to work. In having my camera in my car, I was able to get some fantastic shots.
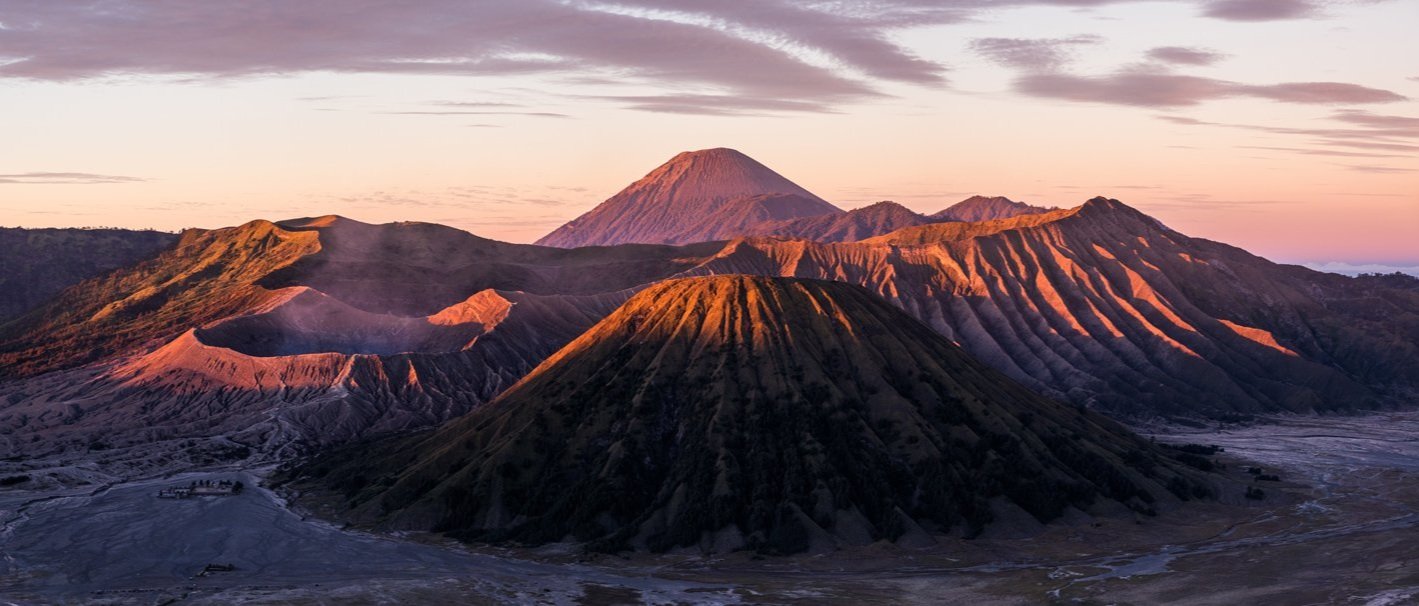
Mt Bromo, Eastern Java, Indonesia.
02. Plan Where You Are Going To Go
Planning is a major part of landscape photography. I plan most of my shoots, I keep an eye on the weather, and I have my cameras in my bag the whole time, with memory cards clear … batteries charged and all my lenses ready for action.
Also this is not a case of planning one trip and then going on it. It is more a case of researching for your landscape photography. Find out where there are good places close to you, find out where is good a medium distance away from you, and then also find some places you would like to go and visit within your lifetime.
Planning is something I do on a regular basis and if the weather hasn’t been great, and I have been stuck in the house for a week or so, I’ll research some new locations to make myself feel a bit better … and have something to look forward to.

Me wondering if I’d made the right choice …
03. It is OK to Take Bad Photos
When you go out to a location, you might get lucky and get a fantastic photo first time out, but a lot of the time, the conditions will just not play in your favour and there are a lot of things that have to line up for you to get a good landscape photograph.
This means there is a lot of things that are out of your control.
However, if you plan your shoot, keep an eye on the weather and keep going back to the location with persistence, you will end up with some great photographs.
So if you do go to a location and the conditions aren’t good, still take photographs, and don’t worry about them being bad.
In taking bad photographs, or at least photographs that aren’t portfolio worthy, you will learn so much about your camera, about your camera settings and about what works and what doesn’t as well as getting the most out of what you have in front of you.
You can also practice different techniques from focus stacking to exposure blending … and this will expand your knowledge even further in photography.
After all of this … if you are persistent enough, when you do get good conditions, you will be much more prepared to get some great photographs.

A distant rainstorm looking south from Cader Idris
04. Commit To Your Plan
A lot of people talk about planning in landscape photography, but not so many talk about the best thing about planning, and that is building anticipation and excitement for the photography shoot!
If you plan a landscape photography trip, make sure you book the time off … make sure you have permission from the long haired general, and build up some excitement for it. This will then get you really ready for the trip. Then when it comes to getting up when that alarm clock goes off at that ridiculous time in the morning, you will get up and you will end up out in that location.
In the past, I have slept in … and most of the time, it was because I didn’t do this. Other times it was because I looked outside the window when I woke up with the alarm and the conditions didn’t look great … and then over the next few hours, as sunrise got closer, the conditions started to get better … and this is where I really got annoyed with myself for not commiting to the shoot.
So commit to it, and head out no matter what (within reason) and you will end up with some amazing landscape photos!

Tryfan on a less than stellar day still makes for a great photograph
05. Use Aperture Priority
I have heard a lot of people being wrongly told to use manual mode all the time in landscape photography. This is such bad advice for photography in general.
Manual mode is good, but using it doesn’t make you any better as a photographer … and to be honest, it can actually make you a lot worse if you don’t know how to use it effectively. I even know a few people who almost quit because they were getting frustrated with not getting what they wanted out of manual mode.
So take the pressure off yourself, switch the camera to aperture priority mode and just enjoy the day.
Get to know how aperture priority works and have fun with your photography.
Now don’t get me wrong, manual mode has it’s uses, when it comes to specialised conditions, and as a learning tool, but your camera has multiple modes for a reason. Certain modes suit certain conditions and it is not a one mode suits all kind of thing, or a “you’re not a pro unless you use manual mode” either … this is the opposite to what photography is all about.
If you use aperture priority in conjunction with exposure compensation (E.C.), this will give you the ability to get a good exposure really quickly.
Exposure compensation is a setting where you can override what the camera thinks is right. So if the image looks too dark, you push the E.C. into the plus figures, and if it looks too bright, you push the E.C. into the minus figures.
I take the majority of my landscape photos in Aperture priority and it really does make the experience much more enjoyable.
The main things I use manual mode for is for astrophotography, timelapses or if I have time to play with the settings. But if I am walking about or the conditions are changing quickly, this is when aperture priority comes into its own.
06. Get to Know Your Camera
Now this kind of relates to committing to the landscape photography trip, but when you go out on a regular basis no matter what the weather (within reason), you will get to use your kit on a regular basis. This will give you a really in depth knowledge of your kit and your camera … and the better you know your camera, the more you will instinctively know where each of the settings are and how to get the best out of it.
So when the sky lights up and you have some amazing conditions in front of you, you will know what to do.
07. Find Your Subject and Remove the Distractions
If you are taking landscape photos, but aren’t happy with them … as long as they are in focus, and exposed well, this could well be to do with there not being a subject in your frame.
If a photo has a subject, it has a purpose, it has a reason to exist. If there is no subject, or there is no definite idea behind the image, this is when it might be a bit meh …
So look at your photographs. If you see one you really like, ask yourself what is the subject? Then find one that isn’t so good, and again, ask yourself what is the subject?
I bet that most of the time it will come to the subject or lack of subject in your photograph.

A flat and boring photograph with no subject …
This has a definitely subject and is much more striking …
With these two photographs above even though the photograph on the right hand side isn’t technically perfect, it is much more striking than the boring image on the left. This is because it has a definite subject.
There are other things that are playing in its favour, like contrast and composition, but the simple fact that the photograph has a subject has added to this as well.
Bonus tip! - Explore The Subject
Once you have found your potential subject … it is time to explore that subject. Just taking one photograph at eye level is ok, but you can do better.
Can you include a foreground to make the subject come alive?
Is there a better vantage point you could hike to to get a better photograph?
If you got your camera really close to the floor would this help?
Can you get an aerial photograph of the subject?
Are there any leading lines you can find in the area?
And ultimately, would there be a better time of day to come back and get better lighting?
I try and do this as much as I can. Once I have the photograph that I planned for, I see if I can get a better image or I make a note of any other places to take photographs from if the light has gone by the time I find them.
Location scouting is a great way to search for new and different locations, and when the weather isn’t doing what I hoped it would, this is when I just go for a hike and try to find some new shots … sometimes if the wether is very changeable, this is when you might even be surprised by a new shot right there and then.
The camera clip I always use: Peak Design Capture clip (It's expensive but well worth it!)
Want to buy a Camera today!?: Click here
My Equipment list:
Some of these are affiliate links, which means at no extra cost to you I will make a small commission, if you click them and make a qualifying purchase.
If you would like to see more, subscribe and turn on notifications for weekly videos, hints and tips and more. If you know anyone who would benefit from this video, please do share and like the video.
Thanks
Mike